Usually, the "as-shot" video requires some adjustment to look its best for playback. The most basic correction, which I generally need to use on every shot, is a "curves" adjustment to adjust the overall image brightness and contrast. This tool will be familiar to Photoshop users, and it works here on video in just the same way as it does in Photoshop on stills.

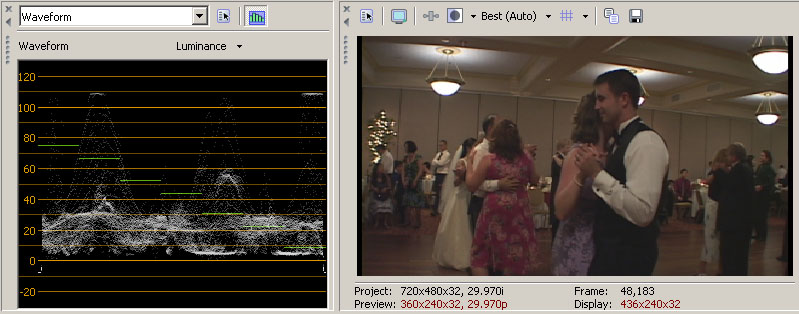
Above is part of a screen capture from the Sony Vegas 6b software running under Windows XP. At the right is a video preview, and at left is a "waveform monitor" window, which shows you the brightness of the image as a graph with IRE units on the left-hand axis.
Technical Details: the IRE scale runs from 0 = black to 100 = white. Now, there is something called 7.5 IRE setup black level, but don't worry about that, as it applies only to analog NTSC, and this is strictly a digital file. The maximum brightness that most DV cameras record is "super-white" at 108 IRE units, but the maximum "broadcast legal" level is 100 IRE. I'm not broadcasting anything, but as it turns out my DVD encoder also clips whites above 100 IRE, so I want to adjust my video to fall within the legal range of 0-100 IRE. In this particular case, the light fixtures are showing the 108 IRE level.
Except for the light fixtures, the picture is too dark. Even the white shirt sleeves are only a medium-gray level at 55 IRE. The picture should be brighter overall, and the peak whites should be reduced to a legal level (100 IRE). This is easily done, as shown below.

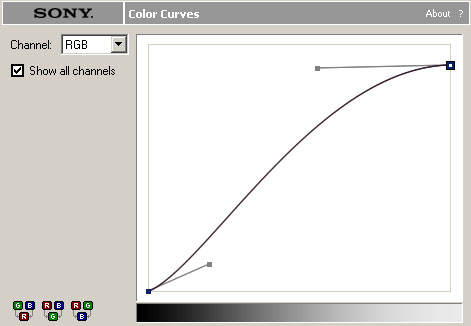
In the Sony Vegas ver.6 NLE program, you can adjust brightness and contrast with a filter called "Color Curves". Most video editors probably have an equivalent tool. In the most basic "Curves" mode, the red, green, and blue channels are adjusted together. This changes the overall image brightness. The graph shown is a transfer curve with the input brightness along the bottom, and the output on the vertical axis. The default curve is a straight diagonal line from lower left to upper right (a 1:1 transfer function). You can change the curve by dragging the endpoints and their tangent lines with the mouse. You can also add new intermediate points on the curve, although this has not been done here. The S-shaped curve shown does three things at once:
1) Moving the rightmost black square down from the default upper-right corner reduces the peak white level. (Annoyingly, Vegas does not show an IRE calibration graph on this plot, but you can see the results interactively on the waveform monitor as you move the graph endpoints around.) In this case the peak white is set to 100 IRE, down from 108.
2) Changing the slope of the curve at upper right affects the midrange tones. In this case the curve is pushed up, making the image brighter overall with a more gradual "shoulder" rolling off the whites without hard clipping.
3) The blacks would look washed out after this treatment, except that the curve slope is also adjusted at the lower-left (blacks) to pull the darkest areas more towards black. Now the curve has a "S-shape" overall.

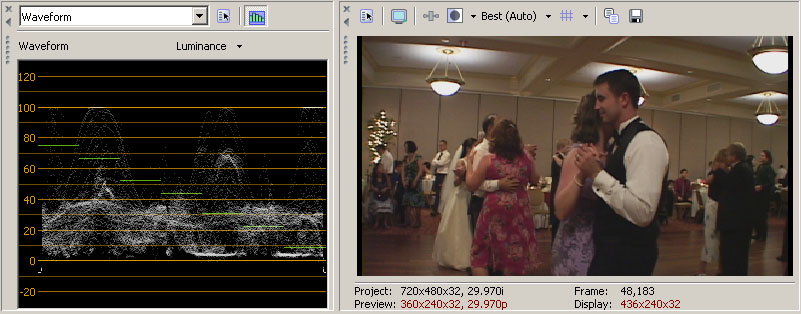
After the curves tool has been applied to the video track, the resulting video appears as shown above. The peak whites are now a "legal" level at IRE 100. The image is brighter overall, with the white shirt around IRE 70, but you can still see that this is a subdued-lighting environment. Notice that the colors appear more vivid as well. This example is not a dramatic correction: much more extreme adjustments can be made, but increasing brightness too much will expose video noise or "grain", as well as compression artifacts.
This image has an overall reddish cast, which can be reduced or removed with a color-correction filter. Color adjustments should be done carefully, as it is easy to get an un-natural appearing image.