


Here are some of the first pictures I took when I got the camera. They give you an idea about still image quality. Click on any image to see it at 640x480 (saved as progressive JPEG, Q=70%). Click on the "FULL SIZE" box below the image for the highest quality, straight from the TRV900's floppy drive to the PC (using what Sony calls "superfine mode", ie the best of three available quality levels.) The Q70 JPEGs are about 40k and the full-size JPEGs are about 170k in size.
I shot these pictures as a video in progressive mode, then selected the individual frames to write on the floppy later while playing the tape back. The ability to run normal, 2x, slow, still, and frame-by-frame, then transfer a frame to floppy all using the remote, is a very nice feature. Of course, slow and still frames are crystal-clear. On the "spider" shot, I was impressed to see the spiderweb threads come out, since this spider (and web) was waving rapidly over the entire field of view due to the wind.
The first two images above are exactly as they came off the floppy. The last image was somewhat dull, so I increased the contrast using a paint program. These pictures were taken near the shore of the SF Bay (in Mountain View, CA) on Sept. 9/10, 1998 by me (John Beale). It hadn't been 24 hours since I got the camera- I'm still on the learning curve.
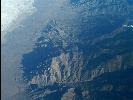
Here are yet a few more. I have here only the thumbnails and medium-scale
images, the full size ones won't fit in my current web directory. (Heh-
who says I have to hold the camera horizontal?) The aerial view is from
an airplane window at 27k feet (somewhere between San Francisco and Dallas,
possibly New Mexico).


Too-dark picture: if you try to take a picture in NO light, it doesn't look good. Here is me on Mission Peak with a flashlight, two hours after sunset. The lights of Fremont in the background, shining through a medium-heavy fog hanging over the peak, provide the only light. 1/4 sec exposure.
Test details: I'm 5 feet from the camera, and the wall behind me is 10 feet away. The "natural" light is from a single 100 watt halogen flood, used indirect (it is aimed at the ceiling, about 3 feet in front of me. The existing light where I am is almost too dim to read by, but you can easily see by it. It is darker than normal indoor lighting, more like a dim restaurant. The camera lens is set moderate wide (if 1=max wide and 10=max telephoto, it's at 3). All camera exposures are at 1/60th of a second, in fully auto mode. The exposure that the camera chose was wide open, +15 dB gain in interlaced and +18 db in progressive mode for the non-flash shots, and f/4, +0 dB for the flash shots. Note that the "progressive" mode is one stop darker than the normal interlaced video, for some reason.
It's probably worth mentioning the photo button works differently than a conventional film camera with flash (where halfway focuses, and full press takes the photo). The '900 is always autofocusing; when you press "photo" halfway down the camera actually takes a flash picture, holding it on the screen saying "CAPTURE". However it has NOT been saved. You have to continue to press the photo button down harder before the red progress bar appears and the image is stored on your tape or PC card, and if you don't, it's gone. A little non-intuitive, and takes some explaining if you hand your camera to a friend to take your picture.
The 3W video light is rather focused, so it illuminates only the area near the flowers, at this wide lens setting. The specs say 100 lux/1m, 25 lux/2m, 12 lux/3m, lighting angle 20 degrees. The color balance shifts when using the flash, but of course this can be fixed in post-processing. The flash has a built-in sensor to adjust the flash energy, but if I have my face any closer than 3' away, the flash will overexpose it anyway. The video light is rated for 100 hours and is replaceable (halogen lamp XB-3D). The flash bulb is rated for 1500 flashes and no mention is made of replacing that. The mount is fixed so you can't angle for a bounce flash; in any case the maximum useful range is about 10 feet.
Timing: the flash is variable-power, so if you take a close-up shot it may not use all the stored energy in the capacitors and so will charge up more quickly. However, normally you'll use the full power, and in that case the recycle time is about 5 seconds. It takes 2 seconds (approx.) to write the still to the memory card, so that's three extra seconds of dead time if you need to take another flash shot. If you're writing a still to tape, that uses 7 seconds so there will be no dead time beyond that.
Conclusions: 3 watts of light is at the lower edge of being useful for video. It helps proportionally more if you're using 1/30 second or slower shutter speed. The flash works quite well for stills. Sony is charging $150 for this combo which seems like a lot.
I also have some capture examples from what is perhaps the ultimate "night-shot" type camera.
Next day: the second sequence was done indoors over my kitchen sink at f/2.4 with 1/4000 sec. shutter in progressive mode. I used three halogen floodlights just one foot from the balloon, totalling 260 watts, and it wasn't really enough. I had to increase brightness on the pictures in post-processing considerably. (Safety note: I used big outdoor floodlights which have a double-envelope construction. I suggest not splashing water on a small-bulb indoor halogen.)
The milk drops splashing onto a plate were done at 1/1000 and 1/2000 with the close-up lens described in the next section.
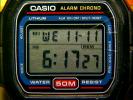
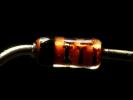
Several people mentioned they liked the close-ups, so here are two more taken with a +4 and +2 diopter "close-up filter" stacked together. I got the Hoya multicoated 52mm +1,+2,+4 set from Adorama for $40. They may be slightly better than my single +7.7 lens. I'm not sure the multicoating option is worth the doubled price. At left: my wristwatch. Due to JPEG re-compression, there are some artifacts on the red background behind "50M" at lower center, which are not present in the original. Next: a 1N4152 diode, which is about 3 mm long without the leadwires. Right: I combine a telephoto with close-up lenses. This gives you large magnification at long working distances, good for example with insects. Two views of a penny, using a +4 lens behind a x2 telephoto (A) and +4, +2 and x2 (B). The (B) image has some colored flares, but (A) is quite sharp and this was taken from 29 inches (74 cm) away! If you didn't know, a penny is 3/4" (19 mm) in diameter, and you can exchange about 210,000 of them for one TRV900.

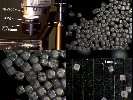
A word about the image on the right, above: people with 35mm cameras
who want to do real close-ups use a "T-ring" adaptor and a second lens
threaded backwards onto the first lens. The T-ring threads into the filter
mount on both lenses, so they are "head-to-head". The TRV900 has a 52mm
filter mount and nothing prevents you from doing the same thing with it, as
I show in this picture of ordinary table salt. You can see the great
enlargement, as the salt grains are about 0.5 mm (.020 inches) across. At
lower left I went a step further and added a +4 close-up lens as well, but
now chromatic abberation gets noticible esp. at the edges of the
frame.
 This
infrared remote comes standard with the camera. I have a picture here showing
you the functions of some of the buttons.
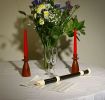
 Please examine these pictures yourself to determine the extent of the problem.
I would say it is noticible, but not a fatal defect; I had my camera several
months before realizing it, and seldom notice it today; it happens only
with saturated, candy-apple-red objects. One reader told me that he uses
his camera in Taiwan where almost all decorations are red (?), I would
suppose it is more of an issue for him.
back to TRV900 main page.